At animation, you should consider many things, and while keeping in mind the basic principles is great, sometimes it just wouldn't always suffice.
It is a well known fact that an animator is really an actor (I would like to consider my self as a shy one).
An actor, just like a magician who needs to perform in front of an audience, should maintain the illusion he wishes to portray, and for doing that, sometimes includes to control the audience point of view and visual focus.
He needs to manipulate the audience eyes to look to one place while he's making an "magic trick" he doesn't wish the audience would see in a different place (sometimes it even could be used to conceal a bad animation).
There are many ways to do so, and I'm not going to get much deeper into it, but an animator could use his animation of course to guide the audience eyes by using his animation (such as body language), by a correct staging and composition, by using his props and surroundings in the scene, etc.
I would like to thank Shuki Gamliel which is a great animator and a good friend, who gave us a short lecture about this subject (it was mainly on using a technique called NLP but I felt it also fit well in animation and I've waited too long to write this post).
Here you could find two examples of how easily you can manipulate the human eye.

Showing posts with label Tutorials. Show all posts
Showing posts with label Tutorials. Show all posts
9/18/10


9/15/10
Walk! A Tutorial About Walks
A good friend of mine (April Peter) had written a serious and thorough tutorial about animating walk cycles.
She has given special attention on how she looks at it from her point of view, what should and shouldn't be done while making a walk cycle (for example - walk cycles in place is a big NO) and it's also really nice to see all the short video samples she made, showing each step to be as clear as it gets.
Read it here!

She has given special attention on how she looks at it from her point of view, what should and shouldn't be done while making a walk cycle (for example - walk cycles in place is a big NO) and it's also really nice to see all the short video samples she made, showing each step to be as clear as it gets.
Read it here!

8/28/10
Werewolf Character Design
Lately I've been looking into some character desing tutorials on Youtube when I came across a clip by Joe Vriens showing his way of work to draw this beautiful werewolf.
I thought it could be nice to share this one with you since he has a very simple technique and still gets a really nice resault.
here is a link to his blog if you would like to see more.
I thought it could be nice to share this one with you since he has a very simple technique and still gets a really nice resault.
here is a link to his blog if you would like to see more.
7/30/10
10/5/08
A Tutorial For Painting In Photoshop

This is something I said I would do a long time ago, and finally I had the time to do it - it's a tutorial to s how my method of working in Photoshop, to better explain the way I'm painting the vector like style.
It's pretty new style I've tried and I'm not well experienced in, but since a few people had asked me to make it, so here it is...
By the way, before I begin, I'm working in CS3 but besides one feature I use, the same could be applied to any older version.
Phase 1 - Ok, so if I don't have a pencil sketch already made, I begin in making a sketch, a random doodle until I kinda like what I got (it's all in the muse, sometimes I just don't "feel" it and in those cases I like to leave it for a while and then come back to it).
I begin in an RGB document, 300 DPI (Dots Per Inch) so if one day I'll like to print it, it would be in a good printing quality and around 1,500 px up until 3,500 px - you decide what aspect ratio you would like to work in.
In this case I've made some spanish looking guy, which was pretty general looking:

Phase 2 - I create a new layer and making new strokes over the old layer by using the pen tool and a simple brush (the color isn't very important right now):

Phase 3 - I begin cleaning the strokes and making them pointy around the edges to make it look really nice, especially around the crowded places like the eyes, inside the ear and in the clothing. Then I'll begin to color the strokes by selecting the checker board icon above the layers window:

Phase 4 - I begin to color the parts, each one in its own layer (skin, hair, clothing, etc):

Phase 5 - Now begins the real fun (if you into coloring at least)! I duplicate each layer, and selecting the areas I would like to be highlight (again, by using the pen tool), changing the volume of the brightness of the layer (ctrl+U/command+u if you are working on a Mac) and usually 10 units are enough. Then I'll do it again, this time I'll choose the shadows and lower the volume in 10 units instead. I've found it much more easy to work in an organized way and keep it in different folder for each part so it would be easier later on to go back and fix stuff I missed earlier. I also added a little frame, but it's just because I think it adds some extra value to it, you don't have to do it of course if you don't want to.

Phase 6 - This is it! Now I rap it all up. I duplicate all my layer and then hide it (it's always good to have the original) because now I take all the layers and combining it into one layer, by converting it into a smart object (so when I would add the filter later on I'll be able to edit it until I'll get the right result). If you don't work on Photoshop of the CS3 you won't be able to use this feature so it would be even more important to keep your original work to come back and change it if the filter doesn't look good. I've chosen my favorite filter - the canvas look.

That's it! You're done! By the way, is it just my imagination or do you find the resemblence to Grimsby from Disney's classic The Little Mermaid?

Let me know if it wasn't clear enough, or if you found it to be useful and interesting so I would know how to improve it for the next time I'll post a tutorial ;)
8/11/07
Making your own shot mask (frame counter)
First of all, I would like to personally thank a friend from AM who send me this - Tobias Von Burkersroda, for making a great effort to bring this tutorial to life, and for letting me post it here.
1. Create a Shot Mask in an empty file
2. Create Text ( Create --> Text Options)
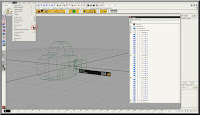
3. Write '0123456789'
4. Select Poly
5. Click on the Arrow ans select your favorite text type
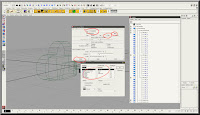
6. Select the created poly numbers
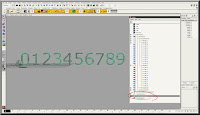
7. Delete the history (Edit --> Delete by Type --> History)
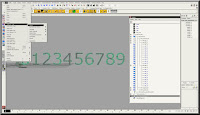
8.Delete the created curves
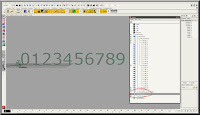
9. Select all numbers and center the pivot ( Modify --> Center Pivot)
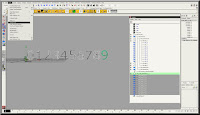
10. Create a Locator
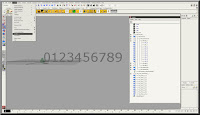
11. Snap all numbers to the Locator
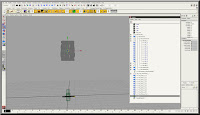
12. Rename the numbers the same way like the numbers of the original Shot Mask
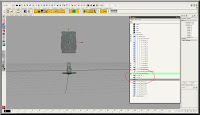
13. Pose them where you want them to be
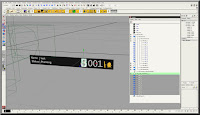
14. Delete the original Shot Mask number
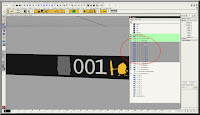
15. In the outliner move the numbers to the group where the original numbers had been.
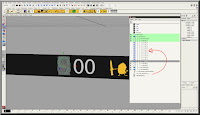
16. Move the time Slider. First of three parts done :)
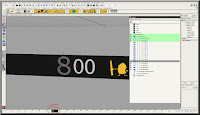
17. Delete the 'AM:digit_2' and 'AM:digit_3'
18. Duplicate 'AM:digit_1' two times and rename the copies to AM:digit_2' and 'AM:digit_3
19. move all the 3 AM:digit_x groups
20. If you have crated a cam, delete it and save the file
21. Go to your scene and import the frame counter and parent it under your Shot Cam
22. DONE ;)
1. Create a Shot Mask in an empty file
2. Create Text ( Create --> Text Options)

3. Write '0123456789'
4. Select Poly
5. Click on the Arrow ans select your favorite text type

6. Select the created poly numbers

7. Delete the history (Edit --> Delete by Type --> History)

8.Delete the created curves

9. Select all numbers and center the pivot ( Modify --> Center Pivot)

10. Create a Locator

11. Snap all numbers to the Locator

12. Rename the numbers the same way like the numbers of the original Shot Mask

13. Pose them where you want them to be

14. Delete the original Shot Mask number

15. In the outliner move the numbers to the group where the original numbers had been.

16. Move the time Slider. First of three parts done :)

17. Delete the 'AM:digit_2' and 'AM:digit_3'
18. Duplicate 'AM:digit_1' two times and rename the copies to AM:digit_2' and 'AM:digit_3
19. move all the 3 AM:digit_x groups
20. If you have crated a cam, delete it and save the file
21. Go to your scene and import the frame counter and parent it under your Shot Cam
22. DONE ;)
Subscribe to:
Posts (Atom)