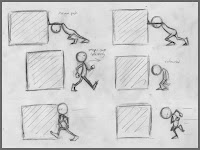
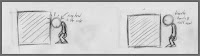
Tha last week was so frustrated due to the reason my animation of the push was not selling, the reference (which I re-shot about 10 times over and over again) wasen't good enough and I just couldn't manage making the constraints between Stewie and the box he suppose to push. Each time I tried to have stewie touching the box, the box leaped forward and I couldn't work like this (I've wasted a whole day just trying to fix this problem, but eventually, I just had to move the box each time I needed it to move).
In the end, I've decided to make one last reference and study it as I never studied poses before (and believe me, it's not like I didn't study hard until now).
It took me 6 whole pages of posing, and work with my video reference very thorough until I'm quite happy with the result.

8/31/07
8/26/07
Class 2 - Session 208
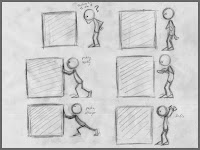
This week we began our last assignment for the second class - I took the push task.
It's making a lot of troubles due to the reason, this time Stewie has hands, and when moving from blocking to spline, they go nuts! turning like a transformers part, shifting places, making me pull my hair out :)
It's making a lot of troubles due to the reason, this time Stewie has hands, and when moving from blocking to spline, they go nuts! turning like a transformers part, shifting places, making me pull my hair out :)
8/18/07


Class 2 - Session 207
This week I had a lot to do - after class, I understood my blocking was incorrect.
The human body cannot bend in a cartoony way like I did in my blocking (by breaking the upper part of the torso).
I also finally managed to fix the counterbalance issue I didn't manage to fix since moving out of blocking plus.
This week was the final spline mode and moving into our last assignment for the semester - I've chose to have "push/pull a heavy object".


8/12/07
A Short film By Mario Pochat - Marcelino and Bartolomeo
Here's a little short film I've found.
The guy who made it is a former AM student - hope you'll like it:
http://www.mariopochat.com/Anim-pages/myb.htm
The guy who made it is a former AM student - hope you'll like it:
http://www.mariopochat.com/Anim-pages/myb.htm
8/11/07
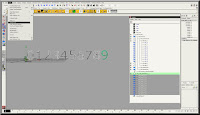
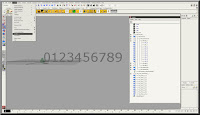
Making your own shot mask (frame counter)
First of all, I would like to personally thank a friend from AM who send me this - Tobias Von Burkersroda, for making a great effort to bring this tutorial to life, and for letting me post it here.
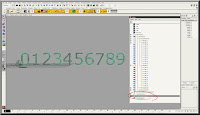
1. Create a Shot Mask in an empty file
2. Create Text ( Create --> Text Options)
3. Write '0123456789'
4. Select Poly
5. Click on the Arrow ans select your favorite text type
6. Select the created poly numbers
7. Delete the history (Edit --> Delete by Type --> History)
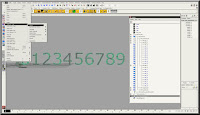
8.Delete the created curves
9. Select all numbers and center the pivot ( Modify --> Center Pivot)
10. Create a Locator
11. Snap all numbers to the Locator
12. Rename the numbers the same way like the numbers of the original Shot Mask
13. Pose them where you want them to be
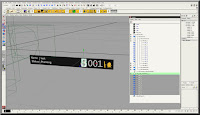
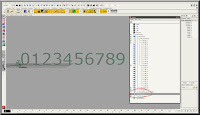
14. Delete the original Shot Mask number
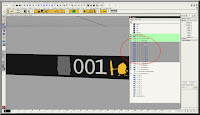
15. In the outliner move the numbers to the group where the original numbers had been.

16. Move the time Slider. First of three parts done :)
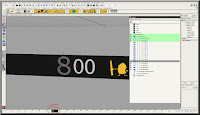
17. Delete the 'AM:digit_2' and 'AM:digit_3'
18. Duplicate 'AM:digit_1' two times and rename the copies to AM:digit_2' and 'AM:digit_3
19. move all the 3 AM:digit_x groups
20. If you have crated a cam, delete it and save the file
21. Go to your scene and import the frame counter and parent it under your Shot Cam
22. DONE ;)
1. Create a Shot Mask in an empty file
2. Create Text ( Create --> Text Options)

3. Write '0123456789'
4. Select Poly
5. Click on the Arrow ans select your favorite text type

6. Select the created poly numbers

7. Delete the history (Edit --> Delete by Type --> History)

8.Delete the created curves

9. Select all numbers and center the pivot ( Modify --> Center Pivot)

10. Create a Locator

11. Snap all numbers to the Locator

12. Rename the numbers the same way like the numbers of the original Shot Mask

13. Pose them where you want them to be

14. Delete the original Shot Mask number

15. In the outliner move the numbers to the group where the original numbers had been.

16. Move the time Slider. First of three parts done :)

17. Delete the 'AM:digit_2' and 'AM:digit_3'
18. Duplicate 'AM:digit_1' two times and rename the copies to AM:digit_2' and 'AM:digit_3
19. move all the 3 AM:digit_x groups
20. If you have crated a cam, delete it and save the file
21. Go to your scene and import the frame counter and parent it under your Shot Cam
22. DONE ;)
Class 2 - Session 206
This week we had to finish the blocking plus.
We had a very interesting lecture by Wayne Gilbert, the author of the book ANAMIE - Simplified drawing for Planning Animation.
Wayne explained about weight, external and internal forces and the right way to move and give your character the right personality.
Here's a link to Wayne's book:
http://www.anamie.com/
8/9/07
Class 2 - Session 205
This week is all about the blocking - make it with a good planning of poses, timing, and make it in stepped mode (like the beginning of the 180 degrees turn).
Subscribe to:
Comments (Atom)